What Is CSM Support? How to Enable or Disable This Boot Option?

CSM stands for Compatibility Support Module, which is an option found in many computers’ BIOS settings. This option allows users to select between two different boot modes: UEFI (Unified Extensible Firmware Interface) mode or Legacy BIOS-Compatibility mode.
Enabling this module will allow the computer to launch OSes that are not compatible with UEFI, such as Windows 7, XP, etc., while disabling it will restrict the user to only using OSes compatible with UEFI, such as Windows 10.
It is important to note that since most modern systems come pre-configured with UEFI enabled by default, most users won’t need to use the CSM setting unless they are having trouble booting certain OS versions on their computer.
So What Is CSM Used For?
You may need to use CSM if you’re trying to install an operating system that has a different bitness than the firmware on your computer. This is common when installing pre-SP1 Windows Vista or earlier, or a 32-bit OS on a machine with 64-bit UEFI.
BIOS boot usually requires MBR partitioning, while some bootloaders support GPT partitioning schemes. UEFI boot typically requires the bitness of the OS and firmware to match – most UEFI machines have 64-bit firmware.
CSM allows you to override this restriction and install an OS even with mismatched bitnesses. Understanding how your PC is set up is important for deciding whether or not you should enable CSM in BIOS.
Should You Enable or Disable CSM Support?
Deciding whether or not to activate the Compatibility Support Module (CSM) in your system’s UEFI firmware depends on the Windows version you’re running. If you’ve got a newer device with Windows 10 pre-installed, chances are it’s been disabled by default and you don’t need to enable CSM support.
But if you’re attempting to install an older OS that doesn’t support UEFI, it must be enabled manually. To ensure that your computer runs as intended, though, it’s important to understand how this works and what implications come with activating the CSM module.
I have noticed that some older laptops and desktops required a BIOS update – to enable the user to enable/disable CSM and UEFI. So please do so before you change any setting!
How to Enable or Disable CSM Support for Various Brands?
Enabling or disabling CSM support in BIOS is easy to do on ASUS, Gigabyte, ASRock, and MSI motherboards.
To get started, you’ll need to follow the steps for each motherboard type.
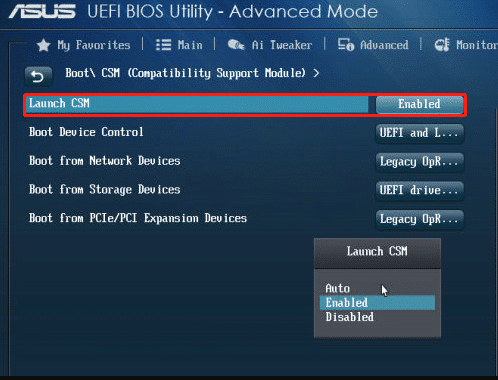
Steps for Asus Motherboard:
To enable or disable CSM support on an Asus motherboard, follow the steps outlined above.
- Start your computer and hold the F2 and Delete hotkey before booting it up. This will enter BIOS (the exact keys may vary depending on your PC’s manufacturer).
- Use the left or right arrow keys to navigate to the Boot tab.
- Scroll down to locate CSM (Compatibility Support Module).
- Change the Launch CSM option from Enabled/Disabled.
- Scroll down and select Save and Exit.
- Restart your machine.
Now that you know how to enable or disable CSM support on an Asus motherboard, let’s move on to Gigabyte motherboards.

Steps for Gigabyte Motherboard:
Now let’s move on to a different motherboard brand—Gigabyte.
Enabling or disabling CSM support on Gigabyte motherboards is also easy as long as you know what to do. To get started, enter BIOS and navigate to the ‘BIOS/Security’ tab. Double-click the ‘CSM Support’ category and change it to either Enabled or Disabled depending on your needs.
After that, open the Power tab and select the ‘Save & Exit Setup’ option to save your settings before exiting BIOS altogether.
With that done, you’re all set!

Now we can look at how to enable or disable CSM support for Asrock motherboards…
Steps for ASRock Motherboard:
If you need to, you can easily turn CSM on or off in ASRock motherboards. To do this:
- Enter the BIOS menu by pressing F2 at startup.
- Scroll to the Boot tab.
- Change the CSM settings from Enabled/Disabled as desired.
- Save and Exit, allowing your system to restart with new settings in place.

This will allow you to get up and running quickly with whatever type of booting you desire.
From here, delving further into other aspects of BIOS is possible for even more customization and optimization potential.
Steps for MSI Motherboard:
You can easily change your MSI motherboard’s boot mode to enable/disable CSM support. To do this, restart the system and press the Delete key to enter BIOS menu. Navigate to the Boot tab, then go to the Boot Mode Select section and select UEFI only. This option is equal to disabling CSM boot; Legacy mode is equal to enabling it, while UEFI plus Legacy mode automatically detects and uses optimum settings for OS. Press F10 key to save changes and exit BIOS, then the computer will reboot.
| CSM Support | Enabled or Disabled? | |
|---|---|---|
| UEFI | Disabled | |
| Legacy | Enabled | |
| UEFI+Legacy | Automatically Detects Optimum Settings for OS |
Steps for Lenovo Laptops:
To figure out how to get your Lenovo laptop ready for a different operating system, you’ll need to check and see if CSM is enabled or disabled in the BIOS. Here’s what you need to do:
- Turn on or reboot your laptop and hold down the F2 shortcut until you see the BIOS screen.
- Use the arrow keys to highlight the Boot tab, then select Boot Mode and press Enter.
- Swap from UEFI to Legacy Support mode, then press Fn+F10 keyboard shortcut and choose Yes when prompted.
- Finally, press Enter to save the boot settings – now your Lenovo laptop is ready for a new OS!
By enabling CSM support in your BIOS, you’re making sure that all hardware components are compatible with an alternative operating system of your choice.
You must take care of this step so that everything runs smoothly during installation and usage afterwards!
Steps for Acer Laptops:
Figuring out how to get your Acer laptop ready for a different OS requires checking if CSM is enabled or disabled in the BIOS. CSM stands for Compatibility Support Module and enables your computer to boot from legacy software. To enable or disable CSM on an Acer laptop, you’ll need to access the Basic Input Output System (BIOS) by pressing the F12 key when your device boots up. The following table outlines each step of this process:
| Step | Description |
|---|---|
| 1 | Turn off your Acer laptop and press F12 while it’s booting up. This will bring you to the BIOS menu. |
| 2 | Use the arrow keys to navigate to “Boot” and select it using Enter/Return. |
| 3 | Find the option labeled as “Compatibility Support Module” and toggle its setting with Enter/Return. |
| 4 | Select “Save Changes and Exit” using Enter/Return followed by Y on the confirmation dialog that appears next. |
| 5 | Your device will now reboot with any changes applied to CSM support settings in place. |
Steps for Dell Laptops:
Changing the Boot List Option from Legacy to UEFI in Dell laptops can help adjust how your device boots different operating systems. This change is necessary if you want to reinstall Windows 10 or higher on the system.
To enable this feature, first press F2 at the Dell logo when powering on the laptop and access the BIOS setup menu. In the Boot sequence section, choose Legacy and change the option to UEFI then click Apply.
Navigate to Advanced Boot Options and disable Enable Legacy Option ROMs before clicking Apply.
Finally, go to Secure Boot -> Secure Boot Enable setting and change it from Disabled to Enabled then click Apply again.
Once all these changes are applied, exit the BIOS setup menu and reboot for them to take effect. Reinstalling Windows 10 should now be possible without any issues.
Steps for HP Laptops:
To access your HP laptop’s BIOS and change the Boot List Option from Legacy to UEFI, press F10 at startup. From the BIOS setup utility window, select ‘System Configuration’ and then click on Boot Options.
Here, you’ll find an option called ‘Legacy Support’. This is where you can enable or disable CSM (Compatibility Support Module) support depending on your needs. To enable CSM support, select ‘Enabled’, save your changes, and exit the BIOS Setup Utility. To disable it simply select ‘Disabled’, save your changes, and exit the BIOS Setup Utility.
It’s important to note that disabling CSM support will limit the number of operating systems that can be installed on your computer since some systems are not compatible with UEFI mode. Additionally, turning off CSM may also cause booting issues due to compatibility issues with some hardware components such as graphics cards or storage devices. If this happens, try re-enabling CSM and see if that resolves any booting issues you’re experiencing.
With all this in mind, it’s up to you whether you want to enable or disable CSM support for your HP laptop; just make sure you weigh out all of your options before making a decision. With that said, however, transitioning into UEFI mode is now becoming increasingly necessary as manufacturers shift towards modernizing their systems—so it may be worth considering enabling it for its many advantages over legacy BIOS modes anyways.
Steps for ASUS Laptops:
Enabling or disabling Compatibility Support Module (CSM) on ASUS laptops is a vital step in modernizing your system. Setting up CSM support is simple and easy to do, with just a few steps to follow.
To enable CSM support, head into the BIOS by pressing F2 during startup of your laptop. Then navigate to the boot menu and set “Launch CSM” to Enabled. When this is done, save the settings and reboot your computer.
To disable it, follow the same procedure but set “Launch CSM” to Disabled instead. This will ensure that only UEFI-compatible boot devices are used, making sure that all features work correctly on modern systems.
Regardless of whether you enable or disable it, make sure you save any changes you made before exiting the BIOS!
Understanding how to properly configure CSM support for an ASUS laptop can help keep your hardware up-to-date and secure for years to come.
What’s the Difference Between UEFI and CSM Boot?
Understanding the difference between UEFI and CSM boot is crucial if you want to successfully install/reinstall Windows 10.
CSM boot mode offers compatibility for legacy BIOS that can support a bootable disk up to 2TB, while UEFI boot mode can support up to 9ZB.
In addition, the two have different Disk Partition Type requirements: CSM requires MBR partition type and UEFI requires GPT.
If you set either one improperly, your Windows may be unbootable. That’s why many users have posted about their CSM boot-related issues in forums.
So it’s important to understand the difference between these two boots before attempting any installation or reinstallation of Windows 10.
With that knowledge, you’ll be able to set your BIOS correctly and avoid any potential issues related to the CSM setting.
Our post on CSM vs UEFI explains this in detail!
How to Fix the CSM Boot-Related Issues?
Troubleshooting CSM boot-related issues can be tricky, but it’s possible.
- To begin with, check if the partition type you’re using is supported by your system. If not, convert it into a compatible format before proceeding.
- Next, ensure that CSM support is enabled in BIOS settings and that the boot order is correct.
- Make sure you have enough free space on your hard drive for Windows to be installed properly.
- Consider running memory tests and disk health checks to identify errors or potential problems with your system configuration.
- Lastly, if all else fails, consider reinstalling Windows 10 or updating your motherboard firmware.
With these steps in mind, you should be able to fix most CSM boot-related issues without too much trouble. Just keep an eye out for any underlying hardware issues that might cause problems down the line.
How Do I Know What Boot Scheme My PC Is Using?
Determining what boot scheme your PC is using can be tricky, but it’s doable.
To start, head into the BIOS of your computer: you’ll need to press F2 or Delete key at the startup screen to enter BIOS. Once in there, look for a setting that says something like ‘CSM Support’ or ‘Legacy Boot’. If it’s enabled, then your PC is using the CSM (Compatibility Support Module) boot mode; if disabled, then UEFI (Unified Extensible Firmware Interface) is in use.
Another way to determine which boot scheme your PC is running on is by looking at its partition table type. GPT (GUID Partition Table) implies that UEFI is enabled while MBR (Master Boot Record) suggests a CSM-based system. It’s worth noting that you can easily convert between these two partition types without data loss via programs such as MiniTool Partition Wizard.
Here are some points to keep in mind when determining what boot scheme your PC uses:
- Check both the settings within BIOS and the partition table type
- You can easily convert between MBR and GPT with third-party software such as MiniTool Partition Wizard
- Make sure you understand which settings you’re changing before making any changes so as not to cause further issues
Knowing which boot scheme your PC uses can help inform decisions about converting from one to another and troubleshoot any potential issues that may arise from incorrect settings or incompatible partitions. With this knowledge under your belt, you’ll be prepared to move on to understanding exactly what CSM support does for personal computers.
Conclusion
It’s clear that CSM is an important tool for keeping your system up-to-date and secure, so make sure you properly configure it when setting up your PC or laptop.
If you’re running a virtual machine, need to boot a 32-bit OS on a 64-bit machine, have buggy firmware, or frequently swap hard drives between machines, then CSM should be enabled.
However, if none of these conditions are true for you then it’s best to proceed with UEFI instead. UEFI offers improved speed, better security measures, and wider functionality compared to legacy BIOS. It also supports more modern operating systems and option ROMs than CSM does.
Ultimately the decision comes down to your unique system setup and needs. Be sure to weigh all the pros and cons before making any changes to the BIOS menu.
I recommend using CSM only for laptops and desktops that are older than 6 years.
Frequently Asked Questions
What is the difference between UEFI and Legacy BIOS?
Do you ever wonder what the difference is between UEFI and Legacy BIOS? It’s an important distinction to make, as it can have a significant impact on your computer’s performance.
To understand the difference, let’s start by looking at how they both work. UEFI is a type of firmware that runs on modern computers in place of the traditional BIOS setup. It allows for more sophisticated startup processes than Legacy BIOS, such as pre-boot authentication and faster boot times.
On the other hand, Legacy BIOS lacks many of these features but provides more backward compatibility with older hardware and systems.
So which should you choose for your machine? That depends on what type of system or hardware you are running, so be sure to do some additional research before making a decision!
What is the impact of enabling/disabling CSM support on performance?
Enabling or disabling CSM support can have an impact on the performance of your system.
If enabled, CSM support allows for booting from legacy BIOS devices. However, this can cause longer boot times as the system must switch back and forth between different modes.
On the other hand, if you disable CSM support, then your system may run faster but you won’t be able to use legacy BIOS devices.
Ultimately, it depends on what type of device you’re using and whether or not that device requires legacy BIOS support. Consider your needs when deciding whether to enable or disable CSM support to get the best performance out of your system.
How to check if CSM support is enabled or not?
You can check if CSM support is enabled or not by entering your BIOS/UEFI. From here, you need to look for a setting related to CSM Support. It may be labeled ‘Compatibility Support Module’ or something similar. If it is enabled, the option will usually say ‘Enabled’ or ‘Auto’.
You can then disable it if you choose to do so. Just make sure that any other settings associated with this are adjusted accordingly before saving and exiting the BIOS/UEFI menu.
What is the best method to troubleshoot CSM boot-related issues?
Do you want to know the best way to troubleshoot any issues related to CSM booting?
To do this, you need to identify the source of the problem first. Start by checking your BIOS settings and make sure that CSM is enabled. If it is already enabled, then look at other factors such as your hardware configuration, or check for any software updates.
Additionally, you can try resetting your BIOS settings to their default values if all else fails.
All in all, a systematic approach to analyzing potential causes and using various methods of troubleshooting will help you resolve the issue in no time!
Can I enable/disable CSM support without entering the BIOS?
No, you can’t enable or disable CSM support without entering the BIOS. CSM (Compatibility Support Module) provides a backward compatibility layer for older operating systems and is enabled by default.
Depending on your system, you may need to enter the BIOS to adjust settings related to CSM. If you’re experiencing boot-related issues, adjusting CSM settings in the BIOS may help resolve them.
It’s best to consult your motherboard manufacturer’s documentation before making any changes, as they can be complex and have unexpected results if done incorrectly.


